Saturday, February 28, 2009

Boston Cream Pie Cupcakes

This post is a few days over due, and sadly, all the evidence of the project has been consumed. But it was great while it lasted.

The idea for these cupcakes was inspired/completely ripped-off of the genius that is Michelle Yu. Knowing that our mutual friend, Barbara, had an insatiable love for the once "Mile High Boston Cream Pie" from Marie Calendars, Michelle made Barbara Boston Cream Cupcakes for her birthday last year, and they were amazing. I'm not positive what her recipe consisted of (whether she used cake box or homemade and whether she filled them with custard or pudding), but I opted to make my own rendition of them using the from-scratch method. I poked around for some recipes online and pieced together the things I liked about a few of them. The end result was a sturdy yellow cake filled with a creamy vanilla custard and topped with a thin, semi-sweet, chocolate ganache. A winning combo, but with room for improvement.

So I don't have much experience with Boston Cream Pies, so I don't actually know what to expect. Maybe that makes me a well-qualified creator of the confection, because my standards are not based on comparisson, but rather compelled by a general expectation for all the flavors and textures to work well together and simply taste good. I did a little research about the original concept, and apparently it is supposed to be a sponge cake, which is not what I used. Maybe that would make the cake a little more delicate, which might better compliment the creaminess of the custard that goes inside it, unlike the denser yellow cake that I used in my recipe where the custard was sort of lost in the texture of the cake. I also think there could have been a stronger presense of the chocolate (but really, when is that not true?), so would opt to make a thicker ganache next time.

But the real fun part was figuring how we'd get the custard inside the cupcake. Method #1, in retrospect, was a crude attempt to beat the laws of physics dealing with volume and mass displacement. Apparently forcing the custard into the bowels of the cupcake by way of injection results in a minimal custard to cake ratio, as well as a gradual un-jection of custard as the so called pressure of the cake form slowly returns back to its unbloated shape and rejects it's forced filling.

So the best method I came up with was actually taking this fancy little apple-corer contraption I had and drilling a 3/4" diameter hole into the top of the still warm cupcake. For some miracle of science, this process actually worked, and worked very well. I would dig down a little over an inch and the perfect cylinder of cupcake would neatly be extracted. After filling the hole in with custard, I then covered up the operation by putting the tip top of the cake cylinder back on the custard-filled hole in order to "protect" the custard filling and give it a barrier from the ganache I was about to dip it in. The only side effect that came about from that process was the evidence of a little, what Barbara referred to as, belly button. Once the cupcake was dipped and the ganache had settled, there was a distinct trace of where the hole had been cut, and a slight elevation of the cylinder top through the ganache. What does this mean? Well. I guess more experiments will just have to be made to perfect a more seamless method.

Sunday, February 22, 2009

Neopolitan Cupcakes

Can't decide what flavor you want? Why not have them all-in-one!?

I made cupcakes for a birthday at the office tomorrow and was given liberty to choose the flavor.
*drunk with power*

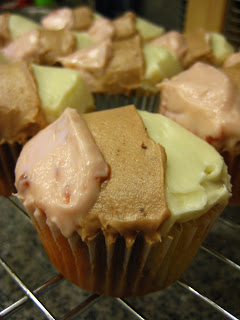
I saw an image for a Neopolitan Cupcake recipe in one of the many cupcake cookbooks out there, and was disappointed in how the cupcake itself was merely a marble cake that completely disregarded the strawberry flavor altogether. Feeling like it was an issue I should fix, I created the complete Neopolitan Cupcake, from batter to frosting - through and through.

I decided to use my standard "off-white" cake recipe (not quite white, not quite yellow) and double it. I creamed the butter and sugar all together, then separated it into 3 bowls. I then specialized each batch by adding cocoa powder to one and a couple tablespoons of strawberry jam to another and finished mixing the batters. (Admission of guilt: I wanted to leave my cupcakes all natural, and as nature intended and all that, but couldn't help the marketing person inside me who was not convinced that the strawberry looked very flavorful, so did add a dab of good ol' red concentrate to liven the batter up).

To prepare them, I actually ended up cupping each liner in my hand and quickly dropped a spoonful of each flavor into the liner, while carefully using gravity to keep the strawberry batter on the far edge of the liner while I hurried to fill the rest with chocolate and then vanilla. The vanilla in many instances ended up more or less resting on top of the chocolate scoop, but once I put the liner into the pan, it seemed to smooth out and look more even.

I baked them for just under 20 minutes, and made a cream cheese based frosting for them. I did similar to the batters by simply adding cocoa powder and jam to make the second and third flavors. The only thing I would do differently next time is create each batch of frosting completely separate (instead of creaming the butter, cream cheese, and powdered sugar altogether and then separating them into 3 bowls at that point). I think the differences will be that the cocoa powder will be sifted in with the powdered sugar from the start, making it smoother, and the jam to frosting ratio will be better proportioned, as this time, I felt like the strawberry frosting was a bit runnier than the others.

But all that considered, I think it worked out well. It was a bit more labor intensive than most cupcakes simply because I decided to frost them all by spatula in 3 separate batches as opposed to using 3 separate pastry bags. But I thought it would have a nice effect to look more like ice cream than to have some fancy decorative tip.

I'm ready for another taste-test right now :)

Friday, February 20, 2009

Mexican Chocolate Brownies


My first official sale! I made brownies last night for a lady who is having a Mexican themed cocktail party. Now, brownies are good just about any time, just the way they are, but I thought it would be fun to follow the theme and made a Mexican-inspired variation by adding a cinnamon flavored cream cheese swirl.

I followed my favorite brownie recipe from the wonderful publication "Every Day Food" (yeah, a Martha Stewart owned magazine). Loaded with butter and semi-sweet chocolate, this recipe (when put in for half the recommended baking time) yields the most fudgy, gooey, and delicious brownies ever had. If you're one of those "edge" brownie lovers, this might not be the brownie for you (although my favorite piece is from the side of the pan where you get a little bit of the crunchy crust but also a sizable portion of the moist and super chocolatey insides).

So I made one pan of each. As always, the classic brownie is still a win, but there was something delightful about the cinnamon version that was a nice homage to Mexican Hot Chocolate. I would definitely make them again.

Brownie
  • 1 cup butter
  • 8 oz semi- or bittersweet chocolate, chopped
  • 1 cup flour
  • 1/4 cup cocoa powder
  • 1/2 tsp baking soda
  • 1/2 tsp salt
  • 1 1/4 cup sugar
  • 3 large eggs
Cream Cheese Swirl
  • 4 oz cream cheese, room temperature
  • 2 tbs butter, room temperature
  • 1/4 cup sugar
  • 2 tbs flour
  • 1 tsp cinnamon
Directions
Preheat oven to 350˚

Line 9x9 pan with parchment paper and butter sides and bottom.

In medium bowl, whisk together flour, cocoa, baking powder, and salt.

In a large bowl, melt butter and chocolate over a pot of boiling water. Remove from heat and stir in sugar. Add eggs one at a time until combined. Incrementally add flour mix to chocolate. Do not over-mix.

In a separate bowl, beat cream cheese and butter together, then add other ingredients until smooth.

Pour half the brownie mixture into pan. Pour cream cheese over brownie mix. Top with remaining brownie mix. With spatula, swirl brownie and cream cheese mix. Be careful not to over mix. You can make some very lovely patterns in the batter by gently criss-crossing the batter in opposite directions with the spatula.

Bake in oven for approximately 30 minutes. The original recipe calls for 55-60 minutes, but that produces a very cake-like brownie (at least in my oven). I like mine baked to the point a toothpick inserted in the middle has lots of crumbs sticking to it, but not undercooked where it is still a liquidy batter sticking to the toothpick.

Enjoy!

Tuesday, February 17, 2009

Let it begin!

Hello! Welcome to my new venture: Kathleen's Confections.

I am starting a side business that will hopefully help me fulfill the ever-present desire I have to bake all day long. I am now offering Special Order Baked Goods so that I can continue to provide delectable sweet treats to all those in need of a fix. I am focusing on Cupcakes to start out, so please let me know if you are in need of a dozen or so!

For this blog, my plan is to post recent projects, upcoming events, links to updates on my own site, as well as links to friends' sites to keep every one in the loop about what I might be up to. I apologize if I stray from Baking to other topics of interest, but hopefully you will find them interesting as well!

I am always eager for inspiration, so if you have any Cupcake flavor ideas (or anything else you think sounds good), don't hesitate to pass the ideas along.