Tuesday, December 4, 2012

Holiday Treat Tins Now Available!

Here we go!
Holidays seemed to have snuck up on me once again. This year I blame Thanksgiving for arriving so early. But I made it, and am ready once again to bake up a storm for the sake of Holiday sweets.
As my fourth year in business, I am stepping it up once again and created a quick and simple online store for easy ordering, and hopefully easy shipping, of these tins. No reason to be shy in passing out that url!

http://kathleens-confections.myshopify.com/

This year I have a little bit of the same stand-by favorites, and quite a few new treats to try out. I have made some effort to include gluten-free and nut-free options, but alas, failed to create any vegan treats that were to my liking, so will try again next year for all my vegan friends out there.

Please order by December 12th. All orders (that need to be shipped) will go out on Monday December 17th. If you want your treats Christmas Eve, and are local and can pick them up, please let me know, otherwise I will have all orders ready on the 17th.


Holiday Cookie Tin Combo - $36
A variety pack of quintessential holiday flavors. Lots of spice, a little chocolate, and lots of nutty flavors.
- Brown Sugar & Spice with Lemon Glaze
- Chocolate Hazelnut Biscotti
- Raspberry Linzers
- Milano with Orange Ganache
- Coconut Macaroons
- Espresso Snowcaps
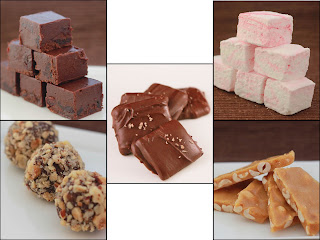
Candy Combo Tin - $30
This tin puts together a variety of the candies available this year:
- Chocolate Covered Caramels with Fleur de Sel
- Frangelico Truffles with Hazelnuts
- Peppermint Marshmallows
- Honey Peanut Brittle
- Black Forest Fudge

Brittle & Fudge Combo Tin - $25
This tin contains 2 kinds of fudge and 2 kinds of brittle:
- Chocolate Cherry Fudge
- Eggnog Fudge
- Almond Roca Toffee
- Honey Peanut Brittle
Truffles & 'Mallows Combo Tin - $25 
This tin comes with 2 kinds of truffles and 2 kinds of homemade marshmallows:
- Frangelico Truffles with Hazelnuts
- Kahlua Truffles with Coconut & Macadamia Nuts
- Amaretto Marshmallows
- Peppermint Marshmallows
Caramel Popcorn Tin - $12
Freshly popped corn coated in a thick and crunchy caramel candy and sprinkled with sea salt. Gluten-free.


Nuts Combo Tin - $12 
This One Quart tin comes with 2 kinds of nut mixes:
- Chili Lime Cashews (gluten-free)
- Sweet & Salty Almonds & Pretzels

Both have a little kick and are great gifts for those who don't have as big a sweet tooth as the rest of us.


Most of these treats are also available a la carte, if you want to mix and match your own basket, or have some freshly baked stocking stuffers.

To order, you can email me at kathleen@kathleensconfections.com or go to my online store. You should definitely use the store if you want your items shipped (gift notes can be included if you send me the message when you check out). If you are local, picking up your order is an option as well, if you live in or near San Francisco, Los Altos, Los Gatos, or Willow Glen (San Jose).

Happy to answer any questions about ingredients, timing, payment options, pick up or shipping options, or anything else that comes up.


Friday, November 2, 2012

Bacon S'mores - First Annual Porktober


My roommate and I hosted our first annual Porktober Party this past weekend, and for the occasion I whipped up a gourmet variation of s'mores that featured bacon.

First step is removing graham crackers and making a crust of bacon in its place. Then you melt rich, bittersweet chocolate over the bacon strips, forming a solid sheet of chocolate covered bacon, and top that with homemade marshmallow cream, and voila! Cut that into squares and torch until crispy and caramelized. No harm in using only the good stuff. We made a special trip to Fatted Calf for the occasion and bought a couple packs of their thick-cut bacon for the purpose. Be sure not to choose a bacon that is seasoned with anything like pepper - the applewood smoked or similar varieties are best for this purpose.

So here's how you do it. I am personally a big fan of baking bacon. I like how I can just pop it in the oven and not mess with it for 30-40 minutes (for thick cut bacon - at 375˚), flipping it only once halfway through. I also like how when you say baking bacon out loud, you sound redundant. Make sure your bacon is super crispy; you don't want chewy, wilted bacon for this. For the full recipe, you'll need 12-14 pieces of bacon, depending on how big it is and how much it cooks down. Seems safe to always have more than you think you'll need.

While the bacon cooks, chop up some nice, high quality dark chocolate. Or milk chocolate. Whatever your preference, just make sure you use a good one. I featured some Scharffen Berger bittersweet in this recipe (70%). I sort of eyeballed the quantity here, but I'd say it was about 8 ounces of chocolate altogether. You can always add more if it doesn't look like enough.


Place a sheet of aluminum foil along the bottom and up the sides of (2) 8x8 or 9x9 inch baking pans and lightly spray with oil or spread with butter on all sides. Once the bacon is finished, and cooled slightly, layer along the bottom of the pans as close-knit as possible, filling in gaps with pieces of bacon if you want full coverage. Then sprinkle with chopped chocolate as evenly as possible and pop back in the oven for 1-2 minutes until the chocolate has started to melt and is easy to spread with a spatula. Be careful not to work too hard to spread it so that the bacon stays in place on the bottom of the pan. I aimed to have a roughly 1:1 ratio of bacon and chocolate, focussing mainly on the chocolate acting as the mortar holding the wall of bacon together. I'm sure there are some who would have had no problem with more chocolate. Your call. 


You can let this set up at room temperature while you make the marshmallow, or if you're an excellent multi-tasker and will have the marshmallow done before chocolate normally sets, you can pop it in the fridge until firm. 

Bacon before and after chocolate spread. 
Now to make marshmallow. I just used the recipe I found ages ago on Smitten Kitchen and have had great success with. I would disclaim that it's not a vegetarian friendly version of marshmallow, but as you have read this far into my post about bacon s'mores, I'm guessing you don't care. Marshmallows are actually one of the easier candy items to make, in my opinion. They don't require getting the boiling sugar up to that high of a temperature, and if you have a stand mixer, they basically just whip themselves for most of the process. A note about the recipe: the only thing you don't need to do is dust these with powdered sugar, so you can skip that ingredient. 


Once you have your marshmallow fluffed and ready, spread it over the tops of the bacon chocolate bars until smooth (or as smooth as you can get considering it's difficult to work with). You need to let it set up in the fridge for about 3-4 hours, at which point it will be ready for torching. 


Lift the aluminum foil out of the pan and cut into roughly 1 inch cubes. A trick with cutting marshmallow is to have your knife blade be slightly wet. This means getting it wet in between each cut, so might as well keep a tall glass of water to dip the blade in by your workspace as you are cutting to speed up the process. Once your squares are cut, they're ready for flame. I happen to own a lovely creme brulee torch which does the trick better than anything. I am sure a more resourceful person could come up with a way to use a regular cigarette lighter, or the oven on "broil," but I enjoy having more control over the toasting process. After all, marshmallow can go from perfectly caramelized to carcinogenic in seconds. 

These were not universally enjoyed, but most people who liked them loved them, so if you're into the sweet, salty, savory flavor combo, I'd say they're worth trying at least once. 

Monday, October 15, 2012

2nd Annual Scharffen Berger Bakery Crawl


This year's Scharffen Berger Bakery Crawl took me to 3 new places I had never been before, as well as one repeat. I was also pleased to be a resident of the the city of San Francisco this time, and may have overly enjoyed the fact I could just catch BART to get to and from the tour. I have only recently made the move, so yeah, it was kind of a big deal to me.

This year's theme was cookie sandwiches. One of the SB reps suggested that they thought the cookie sandwich might be the "next big thing" to out stage cupcakes, but there was some debate about whether or not cake pops were going to be. Time will tell! In any case, our tour was dedicated to finding these said cookie sandwiches, which did come a wide variety of shapes, sizes, types, and flavors.

As last time, we started off in the Scharffen Berger's only brick and mortar shop that is in the Ferry Building along the Embarcadero. Conveniently located adjacent to Miette, a delightful bakery with a variety of tasty treats. Our sample was of a chocolate macaron with sumatra coffee ganache filling. I'm not really into coffee, but the flavor was not overwhelming and the cookie was actually not too sweet, which a lot of macarons can be. Cute little packages, too.


We were then corralled out into our trolly car, and headed down into my neighborhood, the Mission. We came to Goody Goody Cream & Sugar, a cafe that has apparently won best chocolate chip cookie in the city award.  Not what we were there to try though. The owner is a long time food industry veteran who had gotten burned out and decided she needed to call the shots, so opened this place up with her family. 


It was a fun spot in a kind of worn down looking block across from this amazing mural.


She created for us the most amazing flavor combo I have ever had in a cookie sandwich. Oil cured cocoa wafers filled with a buttercream with preserved lemon and fresh basil. I know right, what the hell is that going to taste like? It was amazing. I was super skeptical since I've had some pretty overwhelming basil-in-my-dessert experiences, but some how this one worked perfectly. No flavor out-did any other. The cookies were super crisp and nutty, and had a nice salty flavor, and the lemon and the basil worked together being a combination of tart, sweet and savory. I definitely took 2.


We got back in our trolly and headed over the hill to Cole Valley to Ice Cream Bar.

It had a cute interior, with a very retro feel.


The owner served up an amazing platter of ice cream sandwich cookies. It was by far the worst episode of food paparazzi, as we couldn't stop taking pictures of the amazing pile of perfectly stacked sandwiches, but the owner finally forced them upon us since they were in fact filled with now melting ice cream. 


When I first read the flavor on the cards we were given at the start of the tour, I was also skeptical. I am not a big banana-in-desserts fan, and worried that the flavor would overpower the whole piece. Ok, here's the mouthful: Caramelized honey and milk chocolate ice cream sandwiched between 2 banana and cocoa nib cookies (with caramelized cocoa nibs studding the sides, also). 


I ate the entire thing. I mean, it was the size of my fist, let me be clear.

It was so good. The banana flavor was not super strong and the cookie was super soft and puffy. The ice cream was creamy and perfectly sweet, which worked against the crunchy and slightly bitter cocoa nibs that you got a little bit of in every bite. It was just an amazingly well crafted flavor and texture experience.


Trundling back onto our trolly, we landed at our final stop. Here we are parked in front of Macy's Union Square. We were going into the cellar to watch Yigit Pura do a demo on making an amazing custard based ganache (learned something new!) and got to sample one of his fancy cookie sandwich creations as well. He was also extremely high on sugar, which made him all the more entertaining.


We then popped upstairs to the 3rd floor of Macy's to see his brand new pastry shop, Tout Sweet. A very bright, open and welcoming space, with so many tasty treats to tempt you with.


Ok, maybe this was the bigger food paparazzi moment. 


I don't even know what he had us try, but it was delicious. Also noted that he put a nice smooth raspberry jam filling into each lated raspberry. The details!

It was a delightful end to the trip. We got hang out and chat with him about his presentation and his career moves (the shop had literally opened only 3 weeks before, so he was still working on his baby). He also just started offering some savory options, of which I recall sous vide egg sandwiches being on the menu. Must go back!


Another year, another contest - with a bigger prize this time: www.chocolateadventurecontest.com/


Thanks again to Scharffen Berger for hosting such a lovely bakery crawl.

Thursday, June 21, 2012

Summer Basket + Caramel Corn-on-the-Cob


Welcome to Summer! I made another seasonal basket for the occasion. It was filled with orange 'n' cream cake pops, watermelon shaped sugar cookies, and my favorite: caramel corn-on-the-cob baggies.


Once you've made the caramel popcorn (recipe to follow), to package them, I had some small narrow bags that I filled a little bit of popcorn into, then twist-tied off at the top. I then took a strip of yellow tissue paper and another, larger strip of green tissue paper and wrapped them around the baggies, covering the backs, but leaving the fronts exposed, and twisting them at the top to look like little ears of corn. I tied them off with a little bow, but there might be a more elegant solution to keep the corn look about them. 

Caramel Popcorn with Sea Salt
Taken from Martha Stewart
- 1 tablespoon vegetable oil
- 1/3 cup popcorn kernels
- 8 tablespoons unsalted butter, cut into pieces
- 1 1/4 cups packed brown sugar
- 1/2 cup light corn syrup
- 1/2 teaspoon salt
- 1 teaspoon vanilla
- 1/2 teaspoon baking soda
- Vegetable-oil cooking spray
- 1 1/2 teaspoons sea salt

Coat a rimmed baking sheet with cooking spray. Heat oil in a large pot over medium-high heat until hot but not smoking. Add popcorn, and cover. Cook, shaking pot frequently, until corn has finished popping. Transfer to a large bowl. (Or use a whirly pop. Amazing!)

Heat butter, brown sugar, corn syrup, and salt in a saucepan over medium-high heat, stirring until sugar has dissolved and butter has melted. Clip a candy thermometer to side of pan, and cook until mixture reaches 290˚. Remove from heat, and stir in vanilla and baking soda.

Drizzle syrup evenly over popcorn, and toss to coat (this is harder than it sounds as you have to race the clock before the candy hardens. I found it was great to have a friend help me - I poured and she tossed with 2 large spoons. Be careful not to touch the molten liquid candy, too). Spread popcorn on prepared baking sheet, and sprinkle with sea salt. Let cool completely, then separate popcorn into pieces. Popcorn can be stored in airtight containers for up to 3 days (how could it even last 3 days? The stuff is so addicting!).


Monday, June 18, 2012

Horchata Cupcakes, Gluten-free


Horchata, a delightful Mexican beverage made from sweetened rice milk and spiced with cinnamon, has been a favorite of mine since I first discovered it at 11 years of age. My friend Tracy and I had a mix that we would blend up and sip on for hours. Later, I discovered that mixes were nothing compared the goodness of a real home made horchata, and have never looked back since.

Horchata is typically made by soaking white rice in cinnamon stick spiced water for hours, then draining out just the "rice milk" and adding sugar and vanilla to it until just right. Seductively simple, just requires a little fore thought, with the soaking.

The other side of this is that I've been playing around a lot with recipes that bend to certain dietary restrictions. A long time ago, I had been playing around with mochi cupcakes, which was a fun fusion of a Japanese dessert I had come to love, and my already beloved cupcake. The recipe I was working from called for Mochiko rice flour. Rice flour, although sometimes falsely advertised as "glutinous rice flour" does not actually contain gluten. Starch, yes, but not gluten. As to how it hadn't occurred to me sooner that this was the perfect medium to build another rice based dessert from, we will never know.


I, however, short-sightedly mis-remembered one of the ingredients to this cupcake recipe, so ended up doing my usual on the spot, bake-time experimentation to ward off yet another trip to the store for just one silly can of evaporated milk. Therefore, my new recipe calls for a homemade version of this kitchen staple, with a ricey twist. Also, topped with a rice milk pudding frosting, which is probably more like a custard actually. Best not make these on a really hot day, as the frosting would probably weep right off.

Rice Milk Pudding Frosting

- 16 oz rice milk
- 1 cinnamon stick
- 1/2 cup sugar
- 1/3 cup cornstarch
- pinch of salt
- 2 eggs
- 1 yolk
- 2 tsp vanilla


In a small bowl, whisk together sugar, cornstarch, salt eggs and 1/4 cup of rice milk. In a medium sized sauce pan, heat remaining rice milk and cinnamon stick and let simmer for a few minutes. Don't let milk reduce by more than 1/2 cup. Remove cinnamon stick and slowly pour some of the warm milk over the egg mixture, whisking steadily until it begins to incorporate, then return pot to stove and pour the egg mixture into the milk. Bring to a boil, whisking constantly (pudding will thicken quickly and look chunky unless you whisk very heartily). Once pudding is thick and coats the back of a wooden spoon, remove from heat and pour into a clean bowl. This pudding will make a very thick skin, which normally is fine, but we're going to be turning it into a frosting, so best to cover tightly with saran wrap and refrigerate until needed. 


Cinnamon Mochi Cupcakes
Adapted from the Food Librarian

- 1 pound mochiko (1 box)
- 2 teaspoons baking powder
- 2 tsp cinnamon
- 1 cup butter melted (yeah, gluten free doesn't mean this is healthy, btw)
- 2 cups sugar
- 12 oz evaporated rice milk, made from 16 oz of regular milk  
- 4 eggs
- 1 teaspoon vanilla

Preheat oven to 350˚. Prep muffin tins; will make 2 dozen.

First, in a small sauce pan, heat rice milk over medium heat until reduced to 12 ounces. Don't let it boil. It will take about 10 minutes or so.

In the meantime, in a large bowl whisk together mochiko, baking powder, and cinnamon, and set aside.

In a medium bowl, mix butter with sugar, then one by one, mix in the eggs, whisking until incorporated. Whisk in vanilla. Once the rice milk has reduced to 12 ounces, slowly whisk into butter mixture. Gradually pour butter mixture over mochiko, incorporating them together as you pour. 

Fill cupcake tins with batter and bake for 20 minutes or until edges begin to brown. Let cool.

Check out my new, sweet 24 slot cupcake tin. Fits in my oven and everything! And by new, I mean, someone got it for me at a yard sale, and it is so old and been through it all that it started smoking half way through baking from all the caked on grease it has been harboring. Didn't set off my smoke alarm though, of course. Why would pillars of smoke do that?

Once both parts are cooled complete, then fill a pastry bag with your pudding frosting (it will be thick, but runny, so be prepared to make a mess), and pipe a dollop of pudding onto each cupcake. Sprinkle with a dash of cinnamon sugar if you'd like.

I normally don't condone refrigeration for cupcakes since most of the time they're better off without it, but since these have the more volatile pudding frosting, I would recommend keeping them chilled. The pudding will form a skin if exposed, so if you have a tupperware, that is probably the better method for keeping these stored freshly (and does sort of taste more like its refreshing iced beverage counterpart anyway).

Best solution, of course, is just to eat them.

Tuesday, June 5, 2012

Strawberry Cheesecake Cupcakes


I never cease to be amused by transforming things into cupcake flavors. I am actually rather backlogged in showing off some of the things I baked lately, but long story short, I made a cupcake a couple weeks ago that was an homage to cheesecake, and it made me think that it could really go one step further.
Utilizing the always dependable Smitten Kitchen's epic recipe stash, I incorporated her black bottom cupcake cream cheese filling (with some adaptation) into a honey and graham flour cupcake base, and then topped with freshly sliced strawberries and a homemade strawberry glaze, with a decorative cream cheese frosting border (intended to add structural support in case the glaze decided to get slippery). I am happy to report that everything seemed to work out swimmingly, even for a first experimental try. Love it when that happens.

Honey and Graham Cupcake
- 6 tbs butter, room temp
- 1/2 cup brown sugar, packed
- 1/4 cup honey
- 1 egg and 1 egg yolk
- 3/4 cups all purpose flour
- 1/4 cup graham flour
- 1 tsp baking powder
- 1/4 tsp salt
- 1/3 cup milk

Preheat over to 350˚. Line baking tins. This recipe should make just over a dozen regular sized cupcakes.
Whisk together flours, baking powder, and salt in a small bowl. Set aside.
With electric mixer on high, beat butter and brown sugar until fluffy. Add in honey until incorporated, followed by eggs. Beat until the point of being fluffy again, then turn mixer down low and in batches, mix in flour and then milk until incorporated. Do not over mix.
Dollop mix into cupcake tins to just about half full (aren't we so optimistic). Set aside while making cream cheese filling.

Baked-in Cream Cheese Filling
- 8 oz cream cheese
- 1/3 cup sugar
- 1 egg
- 1 tsp vanilla
- 1 tbs cornstarch

Beat cream cheese and sugar together until smooth, then add in egg and beat until smooth, then add in vanilla and cornstarch until smooth. This is more filling than you will need (go ahead and double the cupcake recipe then!)

Dollop a spoonful of filling into the cake battered cupcake tins. Since the batter is actually kind of thick, I took a spoon and sort of hollowed out the inside of each cup before adding the cream cheese filling. I think it helped keep the filling mor or less in the middle versus resulting in being a top layer of the cupcake.

Bake for 20 minutes.


Cupcakes and filling will rise very nicely, but will fall a little when you take out of the oven. The filling may seem a little giggly while it's still warm, but once they get to room temperature, everything solidifies nicely. Sort of a typical cheese cake reaction, so don't freak out and over bake them.

Strawberry Glaze
So I happened to have about a half a cup of strawberry puree in my freezer from some previous strawberry project, so used that. If I had to guess, I'd say it was about the equivalent of a dozen large strawberries. Maybe 6-8oz. Give or take. To it, I added some undetermined amount of water... let's say 1/2 a cup, and 1/3 cup of sugar. I let that boil until it started foaming up, then strained out the chunks and seeds and put back over low heat and added a surrey of about 1 tablespoon water and 2 teaspoons of cornstarch. Once that started boiling again, I just whisked it all together to make sure it was incorporated and removed from the heat and let set for a couple minutes.  Should coat the back of a wooden spoon easily. And yes, another case of having too much glaze for the number of cupcakes I made. This made a lot of glaze... Enough for maybe 3-4 dozen cupcakes. I will find out how well it freezes and report back in a few months.

Cream Cheese Frosting
This (again) will make way more frosting than you need for this project, but I'm sure you can think of other things to do with leftover cream cheese frosting. You own a spoon, right?
- 8 oz cream cheese
- 8 oz butter, room temperature
- 3 cups powdered sugar
- 1 tsp vanilla
Beat cream cheese and butter together until smooth. 1 cup at a time, add in powdered sugar until mix is fluffy. Add in vanilla and continue to beat (scraping down the sides as needed), until the whole thing is fluffy and elastic.


Once things have cooled down a bit, gently wash off as many strawberries as there are cupcakes (1 per cupcake for medium sized berries - if they are particularly large, 1 strawberry can top 2 cupcakes). When presenting berries, I typically don't drown them under running water, but instead dab them with a moist paper towel to clean them. Otherwise, I guess you could rinse them off earlier in the process so they're are dry again once you're ready to slice them - basically, you just don't need a bunch of excess water ruining your set up at this point.

You then top each cupcake with a splayed strawberry, then using a pastry brush, dollop and spread glaze over it.


With a small tip on a pastry bag, pipe frosting around edges. You can be as decorative as you please, my only goal was to encase the strawberries in an attempt to contain them. The glaze wasn't runny though, so in the end, the frosting ended up being purely decorative (oh, and tasty). 

Tuesday, April 10, 2012

Honey & Kumquat Cheesecake


This was my back up plan for Easter brunch.

See, I had made this wonderful Greek Custard Pie, a la Brown Eyed Baker on Thursday night, and packed it up to bring down with me to L.A. on Friday. I subsequently left both it and the Spanakopita I had made in the fridge at work, only realizing I had forgotten them after having driven about 150 miles.  I never even got to taste it, but my friend (who was still in the Bay Area and had access to my work's fridge) whom I pawned it off on said it was delicious. *sigh*

I wasn't quite able to pull it together for a remake on Saturday once I had arrived in L.A., but had to come up with something to replace it. I liked the idea of wrapping something in phyllo, and the orange zest that was in the other recipe sounded like a nice touch. But I'd already done something with plain ol' orange, so, why not kumquats instead? And whipping up a cheesecake is a pretty harmless venture, especially if you're wrapping it (therefore not worrying about it looking ugly when it cracks on the top because you're too lazy to put it in a water bath to bake it).


One more challenge I proposed was to make it slightly less fattening. Slightly. I'm not all that familiar with how non-fat and low-fat dairy products work in baked recipes, but I figured that so long as I was covering it in citrus and phyllo, that it could mask yet another uncharacteristic attribute of my non-conventional cheesecake. 

So, I looked up an old favorite cheesecake recipe of mine that is the cream cheese and sour cream type. I bought low fat cream cheese (couldn't find Neufchâtel when I went to the store), and non-fat sour cream. I didn't skimp on the butter that I layered the phyllo dough with, so you know, it probably balanced out. 

Honey Cheesecake
Adapted from Allrecipes 
(measurement disclaimer: I was working in a friend's kitchen and never did find the measuring cups, so I just eyeballed the sugar. It came out fine... who said baking was a precise science anyway). 

- 1/4-1/3 cup of butter
- 8-10 sheets of phyllo dough, ready at room temperature, but wrapped until ready to use
- 2 8oz. bricks of low-fat cream cheese
- 1 cup sugar 
- 2-3 tbs honey
- 3 tbs cornstarch
- 1 tsp vanilla
- dash of salt
- 1 16 oz. container of non-fat sour cream
- 4 eggs


Cream cream cheese until smooth. Add in sugar and honey and blend until smooth. Add in the cornstarch, vanilla and salt, then the sour cream. Once that is smooth, crack one egg at a time into the mixture until each one is completely mixed in before moving on to the next. Set aside until ready to fill crust.

Preheat oven to 350˚. Place a sheet of aluminum foil on the rack below the one you will put the pie pan on, just in case butter or cheese cake spills out while baking. 

Melt butter in a small dish and, using a pastry brush, begin to smother a deep dish pie pan (or whatever you want to bake this in) with butter, and continue to brush each layer of phyllo generously with butter until you've used up all the sheets. The edges of the phyllo will dry out quickly, so as soon as you've prepped the bowl, pour the batter into the dish and begin to butter and layer the phyllo edges back over the cheesecake until those are all accounted for. You should have overlap, and make sure the seals are pretty tight. I didn't have any issues with leakage, but I suspect you could if your dough is cracking before you can get the butter on it. 


Pop into the oven for about an hour (check it at 45 minutes or so). Be careful the phyllo doesn't burn, but you do want it nice and brown on top. One thing I didn't expect was the rise. I suppose I should know better from making cheese cakes before, but this was impressive. You can see from the photo up top that the cheesecake batter was mostly level with the rim of the dish when I put it in the oven, but the post baking rim is well over an inch higher than the level of the dish. Impressive! I was pretty afraid this was going to cause problems, but like I said, it never did crack or leak. 


 My "check" for doneness was by the golden top of the phyllo, and when I shook the pan, there was no giggle. I let it sit at room temperature for about 8 hours before I put it in the fridge to chill over night. 

So, while it's cooling, make some candied kumquats. I've never eaten a kumquat before, much less baked with one, so this was a gamble. They just look so darn cute, and they smell good, so why not give them a go. 


Candied Kumquats
- 1 pint container of kumquats, chopped and seeded (didn't know they had seeds... ug. That was time consuming).
- 1 cup sugar (ish)
- 2-3 tbs honey (ish)
- 1 cup water (ish) 

Boil all together until the water is reduced and the mix is syrupy. I just let it go for a while... probably 20 minutes or so. Let it cool a bit while your cheesecake bakes, then pour it over the whole thing once it's out of the oven. 


There weren't any leftovers, so I'd say it came out alright. Honestly, the kumquats were really nice. They had a pretty distinct flavor that was almost akin to Japanese yuzu, which I found very pleasantly surprising. If they didn't have so many seeds, I'd bake with them all the time!

In any case, I'm sure if you were on a mission to find a lower-fat cheesecake option, this variation (minus the oodles of butter in the crust) is a good option. I'd be curious what other people might come up with to kick it up a notch. 

Thursday, April 5, 2012

Chocolate Toffee Matzoh


You know you don't live in New York when you struggle to find matzoh at the grocery store 2 days before Passover. That wasn't about to hold me back from getting a hold of some just so I could make these tasty, crunchy, buttery, caramelly morsels, now was it?

I am not sure who pointed me in the direction of this recipe in the first place, or if I happened upon it while perusing David Lebovitz's extensive blog, but I have made these before and recalled them being ridiculously easy, and ridiculously delicious so wanted another go at them.

Chocolate Covered Toffee Matzoh

Courtesy of David Lebovitz
- 4 to 6 sheets unsalted matzohs
- 1 cup unsalted butter, cut into chunks
- 1 cup firmly-packed brown sugar
- pinch of sea salt
- 1/2 teaspoon vanilla extract
- 1 cup semisweet chocolate, chips or chopped
- sea salt for sprinkling

Line a rimmed baking sheet with foil. Lay a sheet of parchment paper over the foil.


Preheat the oven to 375˚


Line the bottom of the sheet with matzoh, breaking extra pieces as necessary to fill in any spaces.


In a medium saucepan, melt the butter and brown sugar together, and cook over medium heat, stirring, until the butter is melted and the mixture is beginning to boil. Boil for 3 minutes, stirring constantly. Remove from heat, add the salt and vanilla, and pour over matzoh, spreading with a heatproof spatula.


Put the pan in the oven and reduce the heat to 350˚ (I forgot to do this!). Bake for 15 minutes. As it bakes, it will bubble up but make sure it’s not burning every once in a while (also forgot to do this!). If it is in spots, remove from oven and reduce the heat to 325˚, then replace the pan.

Remove from oven and immediately cover with chocolate chips. Let stand 5 minutes, then spread with an offset spatula (I only waited about 1 minute before spreading the chocolate - it was hot!).

Sprinkle with sea salt (or any other topping, of which David recommends a few).

Let cool completely, then break into pieces and store in an airtight container until ready to serve. It should keep well for about one week (if it lasts that long!)


Saturday, March 31, 2012

Spring Basket and Carrot Cake Recipe


On the eve of Spring I made this basket of goodies for a customer. I'm not one to typically create baskets for orders, but occasionally I make it happen. This basket was filled with hazelnut truffle "eggs," carrot cake pop "bunnies," and homemade lemon marshmallow "flowers." Take that, Peeps.


The hazelnut eggs were a simple mix of semi sweet chocolate, a spoonful of nutella, cream, and a drop of frangelico that I coated in semi-sweet chocolate and decorated with colored white chocolate and decorating pearls. I'm not one to use white chocolate very often either, and when buying the chips found that some brands of white chocolate don't even contain cocoa butter! I believe a friend of mine had pointed this out once before, but because I rarely shop for the stuff, it didn't really sink in until this time.
The lemon marshmallows were just my basic marshmallow recipe that I added yellow food color and lemon extract to. I admit, the lemon extract tasted a little bit too fake to me, so if I make them again, I will probably just add zest to the recipe instead. I sprinkled them with yellow sanding sugar on one side, and powdered sugar on the rest of the sides once I cut them with the flower cookie cutters. There were scraps to be consumed after cutting. :)


The carrot cake pop bunnies were pretty cute, but super fragile. I melted white chocolate and using a paint brush (one that I use only for baking/decorating, btw, not a used paint brush or anything) to lay out the ears on some parchment paper and let them cool in the fridge until firm. White chocolate, however, is hardly ever that firm, and found that even the warmth of my fingers was melting them when I tried to stick them onto the white chocolate cake pops. As well, any tipping of the pops onto their side would snap the ears off, so I had to be very careful about keeping them upright the entire time. I don't think I would make these again just because they were cumbersome and fragile.

But, if you're feeling daring, below is my favorite carrot cake recipe which is what I used to make the filling. It's great as a cupcake or a full cake anyway. I made a 9x13 cake for this recipe since I was simply destroying it to make cake pops with anyway. Here's a picture of them when I made cupcakes though, just cuz it's cute.


Carrot Cake
(unknown source, but thanks for it!)

Cream butter and cream cheese until smooth. Trying not to make a mess, gently add in powdered sugar. After about 2 cups of sugar, add the vanilla and continue to add more sugar. I find that cream cheese frosting usually holds its own without any other liquid, but if it really seems too stiff, go ahead and add a smidgen of milk to smooth it out. But be careful, as it can get runny all too quickly.


- 12 ounces, approximately 2 1/2 cups, all-purpose flour, plus extra for pan

- 12 ounces grated carrots, medium grate, approximately 6 medium
- 1/2 cup golden raisins
- 1 teaspoon baking powder
- 1 teaspoon baking soda
- 1/4 teaspoon ground allspice
- 1/4 teaspoon ground cinnamon
- 1/4 teaspoon freshly ground nutmeg
- 1/2 teaspoon salt
- 10 ounces sugar, approximately 1 1/3 cups
- 2 ounces dark brown sugar, approximately 1/4 cup firmly packed
- 3 large eggs
- 6 ounces plain yogurt
- 6 ounces vegetable oil

Preheat oven to 350 degrees F.

Butter and flour a 9x13" cake pan. Line the bottom with parchment paper. Set aside.

Put the carrots into a large mixing bowl and set aside.

Whisk the flour, baking powder, baking soda, spices, and salt together, and then add the carrots to this mixture until they are well-coated with the flour.

In a separate bowl combine the sugar, brown sugar, eggs, and yogurt & oil. Mix wet ingredients into dry until just mixed (don't over mix).

Pour batter into the prepared cake pan and bake on the middle rack of the oven for 45-55 minutes or until top is golden, cake is pulling away from the sides, and your finger springs back when you tap the top of the cake.

Remove the pan from the oven and allow cake to cool.


Cream Cheese Frosting

1/2 cup butter, room temperature
8 oz cream cheese
2-1/2 - 3 C powdered sugar
1/2 tsp vanilla

Cream butter and cream cheese until smooth. Trying not to make a mess, gently add in powdered sugar. After about 2 cups of sugar, add the vanilla and continue to add more sugar if needed (taste test). I find that cream cheese frosting usually holds its own without any other liquid, but if it really seems too stiff, go ahead and add a smidgen of milk to smooth it out. But be careful, as it can get runny all too quickly.

At this point, you can destroy the carrot cake to make cake pops. Smash together some cake with some frosting until it holds together easily, then roll into 1" sized balls. Add popsicle sticks to the center of them and put them in the freezer for at least 10 minutes, or until you're sure they are stuck to the sticks pretty well.

Melt white chocolate and add a bit of vegetable oil, and dip each pop into the chocolate. I thought that the white chocolate was a little harder to work with (maybe it got solid quicker than chocolate, so was harder to spread a thin layer on the pops) so had to keep microwaving the chocolate to keep it spreading consistency. I put the pops on a piece of styrofoam to keep them upright while they cooled. I then added the ears to the tops of each pop. Do it quickly as the white chocolate gets too firm if you wait too long.

I didn't even bother adding a cute little face to the bunnies, but if you're up for it and like decorating, it could be a cute addition.